Repair ZIL-5301
Press the bushings using a special mandrel (see Fig. 1) into the holes of the steering knuckle flush with the surface so that the open ends of the grooves on the bushings are facing the inside of the knuckle (the pressing force must be at least 10 kN)
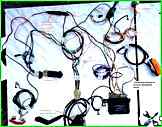
Many questions are asked about the installation of the wiring diagram of the ZIL Bychok turn signals.
That's why I had to cobble together a wiring diagram of the turn signals from the old wiring.

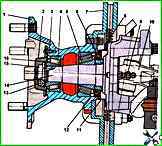
Assembly and installation of the ZIL-5301 cardan transmission
Before installation on the vehicle, the cardan transmission must be fully assembled
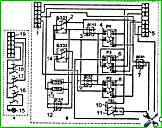
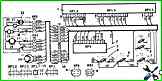
Electrical diagram of the electro-pneumatic door drive ZIL-5301
An electro-pneumatic door closing drive is used on buses and special vehicles. The electrical diagram of the drive is shown below
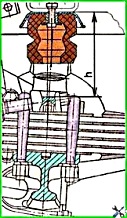
Front suspension - dependent, leaf spring, attached to the frame with elastic hinges.
Guide apparatus and elastic elements - longitudinally located asymmetrical leaf springs
Diagnostics and repair of the ZIL-5301 heater
A decrease in the indicator line on the indicator status diagram shows the state of its extinction (for the PZhD8 heater)
Usually vibration on ZIL-5301 is felt most at a speed of 60-70 km/h
If vibration occurs when driving ZIL-5301:

")
")
")
")
")